There are currently two ways to use PyClone with Home Builder.
Custom Build (recommended) – You can download the custom build of Blender that has has the ability to drag and drop assets and all of the add-ons enabled by default. This is the easiest way to start using PyClone and Home Builder.
Install Add-ons in Standard Version of Blender – If you would prefer to use PyClone and Home Builder as an add-on you can install them as regular Blender add-ons. The only difference is you cannot drag and drop assets from the library. To add an asset from the library, select it in the library, move your cursor to the 3D Viewport, and press the “P” key to place the asset.
How to Install the Custom Build of PyClone
- Download the Custom Build of PyClone from here.
- Extract the zip file to your computer.
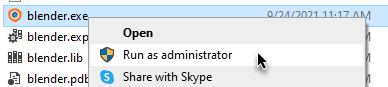
- In the folder you will find the blender.exe file. Right click on the exe and select “Run as administrator”.
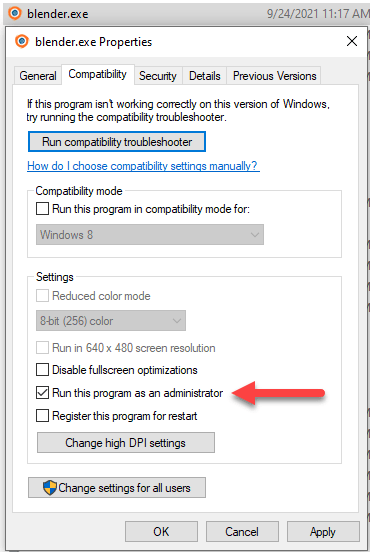
- (Optional) If you want to set run as administrator as default. Right click on the exe and open the Properties Interface. In the Compatibility tab turn on the “Run this program as an administrator” option. Click Apply and OK.
How to Install PyClone and Home Builder as a Standard Add-on
- Download Blender from the Blender Website
- Download the PyClone and Home Builder add-ons from here.
- Open Blender and access the Preferences Interface from the Edit Menu.
- In the Add-ons tab click the “Install…” button in the top right hand corner.
- Browse to the PyClone add-on zip folder and click “Install Add-on”.
- Check the box next to pyclone to enable the PyClone Add-on
- Now that PyClone is installed you can install the Home Builder add-on. NOTE: It is important to install the PyClone First.
- Click the “Install…” button again and browse to the Home Builder zip file you downloaded, and click “Install Add-on”
- Check the box next to the Home Builder Library to enable the add-on.
- Now that you have the add-ons enabled you need to split the interface and open the File Browser Space. I typically split the interface vertically from the top left hand corner of the UI. If you are not familiar with how to split the interface view the documentation from the Blender User Manual.
- After the interface is setup you can save this as the default by going to File > Defaults > Save Startup File.
- Restart the application. Your setup should look something like this.

- Once you click on the Home Builder Library in the file browser panel the library will load and display the assets.
- Remember you need to select the asset then type the “P” key with your cursor in the 3D viewport to place an asset from the library.
- After you drop a cabinet you might get this message. Enable “Permanently allow execution of scripts” and click “Allow Execution”.
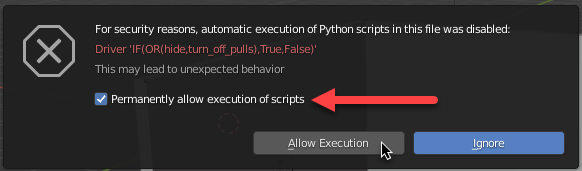
- This is needed so the parametric drivers can be evaluated. In order for this setting to take effect you need to restart the application.
- After restarting the application everything should function properly.
It’s Not Working.. How Do I Get Support?
I am active on my discord channel. If you run into any issues or have questions please ask on my discord server. The link to join can be found here.

Leave a comment