
The Blender Pro Application Template allows you to maintain a library of objects, groups, and materials. Saving assets to your library for future use not only saves you time during the design process, but also allows you to keep your focus on the creative process.
This article will show you how to use the library management tools.
Blender Pro doesn’t currently come with an sample library, but you can easily save your own assets to the library.
The Library Menu
The library is located on the tool shelf in the 3D viewport. The objects, groups, and materials are separated into their own tabs.

Each library has a drop down menu that allows you to run several commands
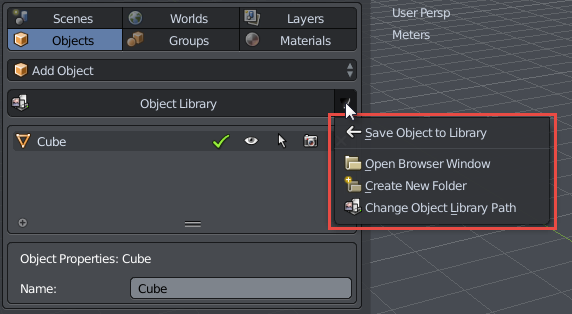
- Save to Library – This saves the currently selected asset to the library. (This saves the asset that selected in the list view. Not the 3D view)
- Open Browser Window – This open the location to where the assets are stored with your operating systems file browser system.
- Create New Folder – This will create a new category in the library.
- Change Library Path – This will open a file browser and allow you to set the path to where the library is pointing to.
Browsing the Library
When you click the Object, Group, or Material Library Button. You will be provided a dialog box that displays your available assets.
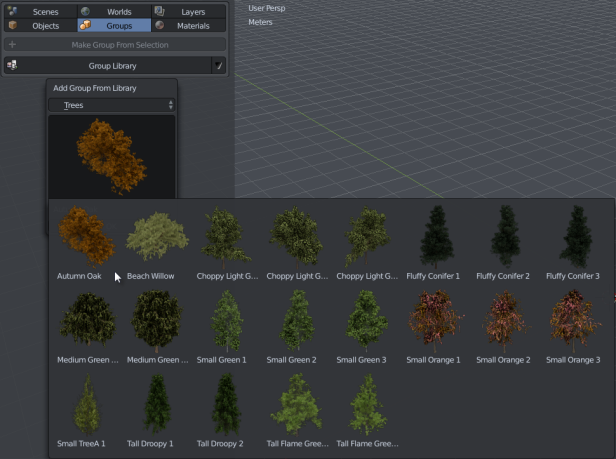
At the top of the dialog box you can select the category of assets that you want to view. If you click the thumbnail you will be provided with a list of all of the available assets in that category.
Placement of the Assets
To add an asset to the scene select the OK button at the bottom of the dialog box.
Depending on the asset that you are trying to place you are provided an automated way to add the asset to the scene.
- Object Library – When adding an object to the scene the object base point will snap to the point on the grid floor or mesh that your cursor is on. To place the object click the Left Mouse Button
- Group Library – When adding a group to the scene the groups parent object will snap to the grid floor or mesh that your cursor is on. If there are multiple parent objects they will all be placed at the same location, so it is good to have a master parent object in the object hierarchy. To place the group click the Left Mouse Button.
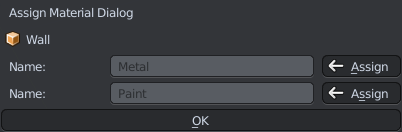
- Material Library – Materials are placed on objects, so when adding a material to the scene click on the object that you want to assign it to. If there are no UV maps then one will automatically be created. If there are multiple material slots then you will be provided a dialog box to select what slot to want to add it to. Click the Assign Button next to the slot you want to assign the material to.
The Future of Blender Library Data
A new Library Management System is currently being developed for 2.8, so we will have a lot more improvements coming soon. Follow the Blender 2.8 Development for more information.

Hello
Great template and really hoping to work with it, one question does the assets library come with the template or do I have to add them in cause when I run the objects/materials maneger it gives me an error and an empty folder.
Thanks
LikeLike
Thanks Alain,
It currently doesn’t come with a library, but I think it will be helpful if it did. If anyone knows of some good CC0 assets that can be included I would be happy to either bundle them with the template or provide a separate download. I think having assets to work with right out of the box is a helpful way to learn.
LikeLike
how i can install it?
LikeLike
Go to file > application templates > install template from file the select the zip file. I hope this helps.
LikeLike
It seems like it doesn’t work very well for me: adding objet to library doesn’t work, can’t either see the files that I already have on my disk. Some tests with adding HDRI world results with totally overexposed lighting. Am I alone having this problems ? Am I doing something wrong? (tested with Blender 2.79b on windows 10) Perhaps there is another place to report bugs?
LikeLike
Yeah if you are running into issues you can report them on the github site. I am going to release some videos that explain some best practices when working with the library management tools. The HRDI setup might not work great for every file. You can always adjust the math nodes in the node editor, but I can probably adjust this to have better default values when adding one. Thanks for the feedback!
LikeLike
I think that this is a very good way to work with Blender. Thank you very much for your work on this. I am having one problem so far and that has to do with libraries. I am on a Mac and when I try to create a library I get instant errors. Where should I put my libraries on a Mac for objects, groups, and materials.
LikeLike
I haven’t tried this on a Mac yet. I will look into it and provide an update that fixes this soon.
LikeLike
” Excuses me for my bad english, I am French”
Hi Andrew,
This UI (Application Templates ) is really amazing!
I would like to download and install the Templates for Architecture (Archipack), can you give me the link please?
It is possible to add Application Templates for SB_auto-blueprint adapter etc…
– layouts also available: (Only)
*1 views Show: side left
*1 views Show: side right
*1 views Show: face
*1 views Show: back
*1 views Show: top
etc…
Link: https://github.com/Pullusb/SB_auto-blueprint
Video: https://www.youtube.com/watch?v=i7CCGe3JxyI
LikeLike
i cant see any objects in the library rather than plane..
LikeLike
Some users have reported issues on Mac OS that I am looking into. I will also be creating some more detailed docs for the library management tools as well.
LikeLike
very cool template. keep going to make great updates. but please do not leave the 2.79 away. btw. i like how easy you draw the grass in your demo. is there any tuts to create it? or maybe we need to buy your library ?
LikeLike
also interested if we can use your tools in the standard interface
LikeLike
Blender Pro is amazing, I have some problem with it, when I save the material or save the object to the library, it pops up erro, Erro report:Traceback…Location::-1.
How can I save the material or save the object?
And another problem is that when I use Blender Pro, the blender add-on I had installed before, I can’t find the menu to use them.
LikeLike
Make sure you have created a category first to save the item to the library. There is a known issue with some add-ons working with blender pro. I will have both of these issues fixed for the 2.8 release.
LikeLike
Hi, Blender Pro is amazing, I have some problem with it, when I save the material or save object to the library, it pop up erro, “Traceback….location::-1”, how can I fix it?
Another problem, when I use Blender Pro, all the blender add-on I installed before, I can’t find the menu to use them, to use them, I had to change the template back to blender default template.
LikeLike
Thanks for this bblog post
LikeLike